Contents
Getting Started
Welcome to Inventory Pro! This guide will help you understand core inventory management concepts and get started with daily warehouse operations.
Understanding Inventory Pro
Inventory Pro provides comprehensive inventory control and warehouse management across your entire organization. The system tracks stock movements from receiving through storage, fulfillment, and shipping-ensuring complete accountability and real-time visibility.
Core Inventory Management Concepts
Inventory Model
Inventory Pro uses a lot-based tracking system where each receipt creates a unique lot record with its own receive date, location, and status. This enables:
- FIFO/FEFO allocation - System automatically selects oldest stock first to minimize waste and ensure product freshness
- Location tracking - Know exactly where each unit is stored within your warehouse
- Complete audit trail - Track every movement from receipt to issue with full user accountability
Transaction Types
| Transaction | Purpose | Effect on Inventory |
|---|---|---|
| Receive | Record incoming stock from suppliers or transfers | Increases inventory (positive adjustment) |
| Issue | Fulfill orders, consume materials, or remove stock | Decreases inventory (negative adjustment) |
| Move | Relocate stock between locations or warehouses | Updates location without quantity change |
| Adjustment | Correct discrepancies found during cycle counts | Increases or decreases to match physical count |
Order Types
- Purchase Orders (PO) - Request stock from suppliers; track what’s on order and expected arrival dates
- Shipping Orders (SO) - Fulfill customer requests; allocate, pick, pack, and ship inventory
- Work Orders (WO) - Assemble finished goods from component parts; track production and material consumption
Staging Area
Many Inventory Pro workflows use a staging area before inventory is finalized. This is the temporary hold where lines, quantities, and locations can be reviewed or adjusted before they affect active stock.
- Save stores work in the staging area without updating inventory.
- Post, Issue, Move, or Receive finalizes the transaction and commits it to inventory.
- Archived records show the completed transaction after it leaves the staging area.
This distinction matters in receiving, issuing, moving, work orders, and other transaction screens. If a transaction was saved but not finalized, the inventory change is not complete yet.
Tracking Methods
| Method | When to Use | Examples |
|---|---|---|
| Standard | Most inventory items | Office supplies, bulk materials |
| Serial Number | High-value items requiring unique identification | Laptops, test equipment, vehicles |
| Lot | Items with expiration dates or quality control requirements | Pharmaceuticals, food products, chemicals |
| Asset | Capital equipment with depreciation tracking | Machinery, vehicles, furniture |
Quick Start Guides
Select a guide below to begin:
| Guide | Description | Time |
|---|---|---|
| Performing a Cycle Count | Perform a physical inventory count to ensure accuracy | 5 min |
| Restocking Inventory | Set up min/max levels and generate reorder reports | 10 min |
| Fulfilling a Shipping Order | Pick, pack, and ship an order to a customer | 10 min |
| Creating a Purchase Order | Order inventory from suppliers | 10 min |
What You See First
The home screen adapts based on whether your system has inventory items yet:
Setup mode (no items in the system) - Quick links to configure the system:
- Import Items - Bulk load items from a spreadsheet
- Add First Item - Manually create the first item
- Configure Warehouses - Set up storage facilities
- Set Up Locations - Define bins, aisles, and zones
Operations mode (items exist) - Daily workflow shortcuts:
- Receive Stock - Record incoming shipments
- Move Stock - Transfer inventory between locations
- Issue Stock - Remove stock for orders or adjustments
- View Inventory - Check current stock levels
Both modes include a Change Theme option in the hamburger menu at the top right.
New User Setup Checklist
Follow these steps to configure Inventory Pro for your organization:
1. Configure Warehouses
Why: Warehouses represent physical locations where inventory is stored. You need at least one warehouse to track inventory.
- Navigate to Inventory > Warehouses
- Click Add Warehouse to create your first warehouse
- Enter warehouse name, address, and contact information
- Configure default settings for receiving and issuing
Tip: If you have multiple facilities or storage areas, create separate warehouses for each location to track inventory independently.
2. Define Storage Locations
Why: Locations help you track exactly where items are stored within a warehouse, making picking and counting more efficient.
- Go to Inventory > Locations
- Create location codes that match your physical layout
- Use naming conventions like:
A-01-A(Aisle-Rack-Shelf) - Assign locations to specific warehouses
Tip: Start with broad zones and add detail as needed. You can always refine location structure later.
3. Add Inventory Items
Why: Items are the products, parts, or materials you need to track.
Option A: Import from Spreadsheet (Recommended for bulk loading)
- Prepare data in Excel or CSV format
- Navigate to Utilities > General > Import and Export
- Upload file and map columns to system fields
- Review and validate data before finalizing import
Option B: Manual Entry (Recommended for small quantities)
- Click the Add Item button on any inventory page
- Enter required fields: Item ID and Description
- Add optional details: Category, Supplier, Unit of Measure, Cost
- Enable serial number tracking if needed for specific items
Required Fields: Item ID (unique identifier), Description Recommended Fields: Category, Supplier, Unit of Measure, Standard Cost
Tip: Already have items in another warehouse? Use Enable Items for This Warehouse from Inventory → Overview rather than creating duplicates. This links your existing items to the new warehouse without re-entering them.
4. Add Suppliers and Customers
Suppliers: Companies you purchase inventory from
- Navigate to Orders > Purchasing > Suppliers
- Add supplier name, contact information, payment terms
- Set default lead times for ordering
- Link items to preferred suppliers
Customers: Companies that receive inventory via shipping orders
- Go to Orders > Shipping > Customers
- Add customer name and billing information
- Configure shipping addresses
- Set pricing and payment terms
5. Configure User Access
Why: Control who can access different parts of the system and what actions they can perform.
- Access System > Accounts > System Users
- Create user accounts for each team member
- Assign security groups (Admin, Warehouse Manager, Operator, etc.)
- Set specific permissions for inventory operations
Security Best Practices:
- Grant minimum necessary permissions for each role
- Separate duties: receiving, issuing, and adjustment approvals
- Regularly review user access and remove inactive accounts
Key Terminology
Understanding these core terms will help you navigate the system and communicate effectively with your team:
Items & Products
- Item - Any product, part, or material tracked in inventory. Also referred to as “Part” or “SKU” in some contexts
- Item ID - Unique identifier for an item (part number, SKU, UPC)
- Description - Human-readable name for the item
- Category - Grouping for reporting and organization (e.g., Electronics, Raw Materials, Finished Goods)
- Unit of Measure (UOM) - How the item is counted (Each, Box, Pallet, Pound, Liter)
Locations & Storage
- Warehouse - Physical facility where inventory is stored (can be a building, mobile unit, or storage area)
- Location - Specific storage position within a warehouse (bin, aisle, shelf, zone)
- On Hand - Total quantity physically in the warehouse
- Available - Quantity available for allocation (On Hand minus Reserved and On Hold)
- Reserved - Quantity allocated to specific orders but not yet issued
- On Hold - Quantity quarantined pending inspection or disposition
Tracking & Lots
- Lot - Unique inventory record created each time stock is received; tracks receive date, location, and quantity
- Serial Number - Unique identifier assigned to individual units of serialized items
- FIFO - First In, First Out; oldest stock issued first
- FEFO - First Expired, First Out; stock with earliest expiration date issued first
- Lot Number - Manufacturer’s lot identifier (different from system lot tracking)
Orders & Transactions
- Purchase Order (PO) - Request to buy inventory from a supplier
- Shipping Order (SO) - Request to ship inventory to a customer
- Work Order (WO) - Request to assemble or produce items from components
- Direct Receive - Record incoming stock without a purchase order
- Direct Issue - Remove stock without a shipping or work order using a negative adjustment code
Inventory Operations
- Receiving - Recording incoming inventory and placing it in storage locations
- Issuing - Removing inventory from stock (for shipments, consumption, or disposal)
- Moving - Transferring inventory between locations or warehouses
- Cycle Count - Physical count of selected items to verify system accuracy
- Allocation - Reserving specific lots to fulfill an order
- Pick List - Document showing which items to retrieve from storage for an order
Common Workflows
Receiving Inventory
When to use: Recording incoming shipments from suppliers or transfers from other locations.
Direct Receive (No Purchase Order):
- Navigate to Inventory > Stock > Receive Stock
- Select or scan items to receive
- Enter quantities and assign storage locations
- Add serial numbers for serialized items (if applicable)
- Post to finalize and add inventory to stock
Receive Against Purchase Order:
- Navigate to Orders > Purchase Orders and click Add Purchase Order
- Submit PO to supplier
- When shipment arrives, go to Inventory > Stock > Receive Stock
- Select the purchase order to receive against
- Verify quantities against packing slip
- Assign storage locations for each line
- System links receipt to purchase order and updates order status
Best Practices:
- Always specify storage location during receive for accurate tracking
- Verify quantities against packing slip before posting
- Inspect items for damage and place on hold if needed
- For serialized items, ensure serial numbers are unique and accurate
Moving Inventory
When to use: Reorganizing warehouse, transferring between locations, or consolidating stock.
Location Transfers (Same Warehouse):
- Navigate to Inventory > Stock > Move Stock
- Select items to move (by location, item, or scan)
- Specify source and destination locations
- Confirm transfer (quantity unchanged, only location updates)
Warehouse Transfers (Different Facilities):
- Issue stock from source warehouse (creates outbound transaction)
- Receive stock at destination warehouse (creates inbound transaction)
- System maintains complete accountability throughout transfer
- Optional: Use transit status to track items in-between facilities
Tip: Use location transfers frequently to maintain organized storage and improve picking efficiency. System tracks all movements for complete audit trail.
Issuing Inventory
When to use: Fulfilling customer orders, consuming materials, or removing damaged inventory.
Shipping Orders (Customer Fulfillment):
- Navigate to Orders > Shipping > Shipping Orders and click Add Order
- Select customer and add line items with quantities
- System allocates stock using FIFO/FEFO rules automatically
- Generate pick list to retrieve items from storage
- Pack items and generate packing slip
- Ship and update order status
Work Orders (Material Consumption):
- Navigate to Orders > Work Orders and click Add Work Order
- Define assembly or production job
- System lists required component parts
- Issue components to work order
- System can auto-receive finished goods when job completes
Manual Issues (Adjustments):
- Go to Inventory > Stock > Issue Stock
- Select items and quantities to remove
- Choose reason code (damaged, sample, internal use, scrap, etc.)
- Document notes for audit trail
- Issue to finalize and reduce inventory
Stock Allocation: System automatically selects oldest available stock first (FIFO) to minimize waste and ensure freshness. Prioritizes by ship date, commit status, receive date, or expiration. Auto-splits across locations if needed.
Inventory Counts & Adjustments
When to use: Regular counts ensure system records match physical inventory; required for accurate reporting and compliance.
Cycle Counts:
- Go to Inventory > Cycle Counts
- Select items or locations to count (can be random, ABC classification, or scheduled)
- Perform physical count and enter results
- System compares count to expected quantity
- Review variances and approve adjustments
- System generates adjustment records to correct discrepancies
On Hold Status:
- Mark inventory as “On Hold” during receiving or via adjustments
- Held stock is excluded from available quantity calculations
- Use for quarantine, inspection, quality control, or damaged goods
- Release from hold once disposition is determined
Tip: Schedule regular cycle counts by rotating through locations or high-value items weekly. This maintains accuracy without requiring full physical inventory shutdowns.
Accessing the System
Login
To access Inventory Pro, open your web browser (Chrome or Firefox recommended) and navigate to the address provided by CISS or your IT department.
- Enter your username and password
- Click Login button
- If using a temporary password, system will prompt you to change it
Account Lockouts: Users may be locked out after multiple failed login attempts. Contact your system administrator to unlock your account. Learn more about user management.
Single Sign-On (SSO)
Inventory Pro supports Single Sign-On via Active Directory, Smart Cards, Common Access Cards (CAC), Okta, and other identity providers. Contact your administrator to enable SSO. Learn more about SSO configuration.
Changing Your Password
System → Accounts → Change Password
- Enter current password
- Enter new password (must meet complexity requirements)
- Confirm new password
- Click Change to save
The system may be configured with password complexity requirements such as minimum length, special characters, or expiration periods.
Navigation
Throughout this documentation you will see directions such as:
Inventory → Stock → Receive Stock → Direct Receive
This indicates the menu path to find a page or feature. The format is:
Menu → Sub Menu → Page → Button or Action
Understanding the Interface
Links - Navigate to new pages or open detail views Icons - Visual indicators of actions or context Buttons - Perform actions based on current form or screen
Common Icons:
- Pencil - Edit or modify data
- Tag - Display label or barcode
- Camera - View item image or asset photo
- Grid - Open bulk edit interface
- Plus - Add new record
- Arrow Down - Receive inventory
- Arrow Up - Issue inventory
- Arrow Right - Move inventory
Lookups
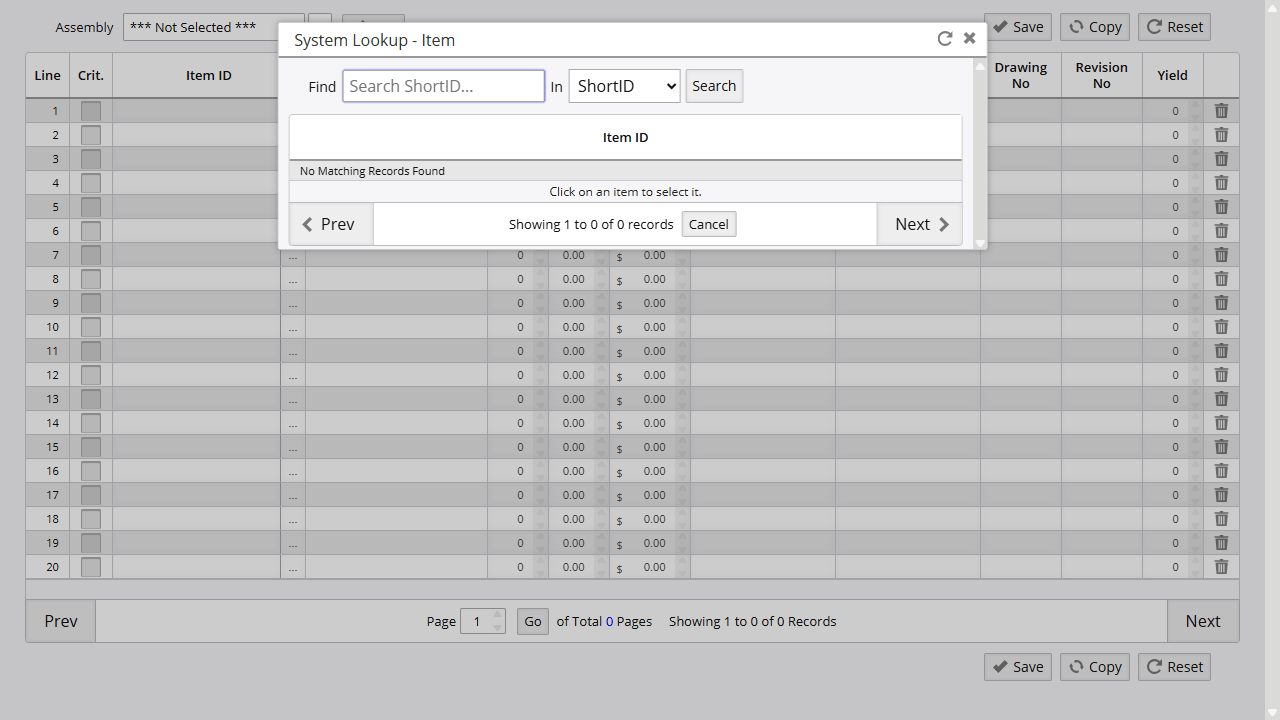
When you need to select a record from a long list (like an item or customer), you’ll see a lookup field with a … button. Clicking this button opens a searchable dialog where you can find and select the record you need. Some screens also support typing directly into the lookup field to filter results.
Inventory Pro Mobile
Inventory Pro Mobile provides warehouse operations on smartphones and tablets-no app installation required. Access through your mobile browser for barcode scanning, receiving, issuing, moving, and cycle counting on the go.
Mobile Configuration
Supported Devices: iOS (iPhone/iPad) and Android smartphones and tablets Access: Open mobile browser and navigate to Inventory Pro URL No Installation: Web-based interface optimized for mobile screens
Barcode Scanning:
- External Scanners: If you are using a dedicated hardware scanner, it must be configured to send a Carriage Return (CR) and Line Feed (LF) after each scan. This is a common setting that ensures the data is submitted correctly to the application. Some scanners may require only one carriage return character.
- Camera Scanning: Mobile will request camera access permission for built-in scanning
Offline Capabilities
Mobile caches your information to speed up workflows and allow limited processing when offline. Whether in a warehouse or field experiencing temporary connectivity loss, you can continue working with local data.
Offline Features:
- View cached item information
- Perform transactions using local data
- Queue transactions for submission when back online
- Upon reconnecting, queued transactions are automatically submitted
Best Practice: Sync regularly when online to ensure latest data availability.
Learn more about mobile operations
Reporting & Analytics
Inventory Pro includes comprehensive reporting to track inventory levels, transaction history, and operational performance.
Common Reports
| Report | When to Use |
|---|---|
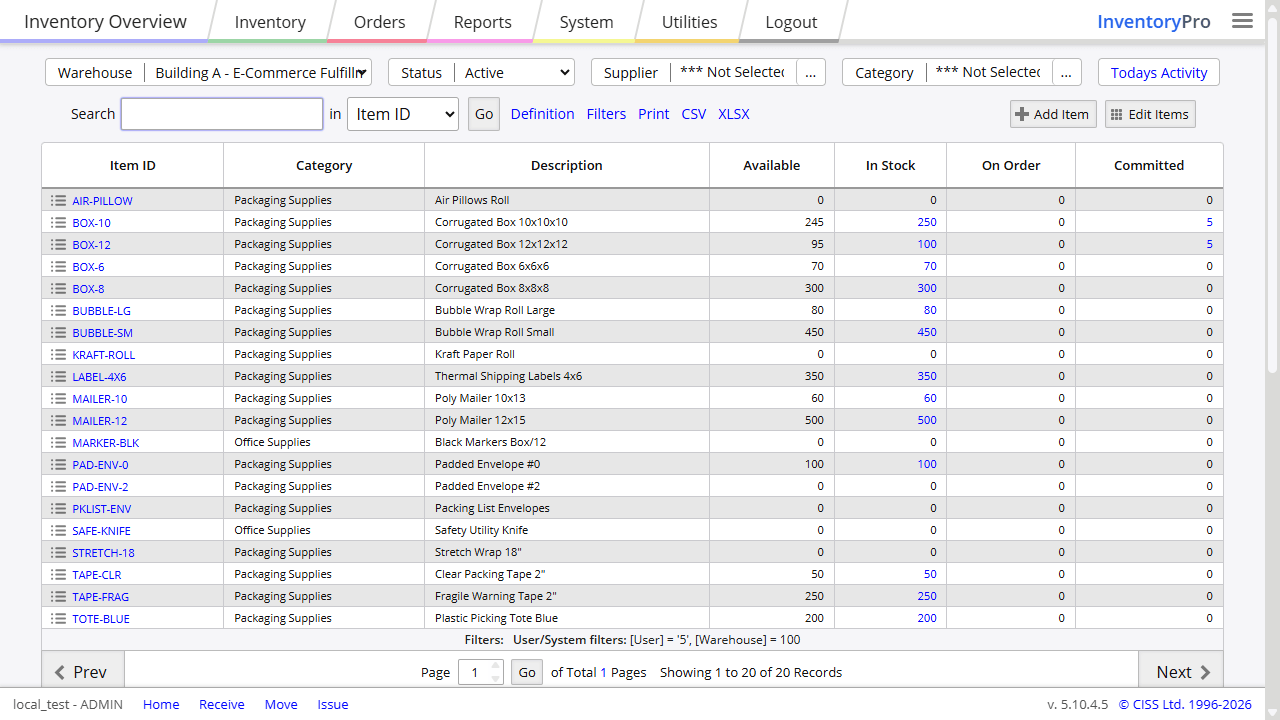
| Inventory Overview | Check current stock levels by item across all warehouses |
| Inventory Activity | Review all receipts, issues, moves, and adjustments for audit trail |
| Inventory Valuation | Calculate total inventory value using FIFO, average, or standard cost |
| Items to Order | Identify items below reorder point that need replenishment |
| Usage Analysis | Analyze consumption patterns and turnover rates |
| Cycle Count Variance | Review discrepancies found during physical counts |
Accessing Reports
- Navigate to Reports menu
- Select report category from dropdown (Inventory, Purchasing, Shipping, etc.)
- Choose specific report
- Apply filters (date range, warehouse, category, item)
- View on screen, print, or export to Excel
Tip: Use the Popular option in the Type dropdown to access your most-used reports, or the Recent option for reports you’ve run recently.
Next Steps
Now that you understand the basics, explore these topics to master Inventory Pro:
Daily Operations
- Receiving Stock - Record incoming shipments
- Moving Stock - Relocate inventory
- Issuing Stock - Fulfill orders and adjustments
- Cycle Counting - Maintain inventory accuracy
Order Management
- Purchase Orders - Order stock from suppliers
- Shipping Orders - Fulfill customer requests
- Work Orders - Assemble products from components
Advanced Features
- Serial Number Tracking - Track individual units
- Bill of Materials - Define assembly structures
- Mobile Operations - Warehouse operations on mobile devices
- Barcode Configuration - Configure scanners and labels
Administrator Quick Start
If you have administrator access, review these areas before going live:
| Area | What to Configure |
|---|---|
| Admin Options | Auto-numbering sequences, form defaults, barcode and label settings, logos for documents, and mobile behavior |
| Integration & Email | System notification email address and API access for external integrations |
| Reporting & Analytics | Report permissions by security group and custom report definitions |
Access these under System → Admin Options and System → Configuration.
Administration
- User Management - Add users and control access
- Admin Options - Configure system settings
- Security & Permissions - Set up security groups
Getting Help
Search Documentation: Use the search bar at the top of any documentation page to find specific topics quickly.
Inline Help: Many screens include contextual help sections (expandable sections with ? icons) that explain features and workflows specific to that page.
Support: Contact CISS support or your system administrator for technical assistance.
Training: CISS offers comprehensive training programs for administrators and end users.
On this page