Contents
Work Orders
Work orders track manufacturing, assembly, internal parts usage, labor, equipment, and related purchasing from one record.
Quick Start
- Open Orders → Other → Work Orders.
- Click Add Work Order to create a new record.
- Save the Header first, then build the Line Items tab.
- Use Assemble for assembly work orders and Issue for non-assembly work orders.
- Use Create PO only when the line items are marked for PO creation and that feature is enabled.
| Action | Path | Notes |
|---|---|---|
| Open list | Orders → Other → Work Orders | Main list page |
| Create | Work Orders list → Add Work Order | There is no separate Create Work Order page |
| Review activity | Work Orders list → Todays Activity | Available in some security layouts |
For shortage planning and downstream purchasing decisions, see Manufacturing Purchasing. For issue-screen details such as location, serial/lot, and Load FIFO, see Issue Stock.
Understanding Work Orders
The Work Orders list defaults to current in-progress work. Use the Warehouse and Job filters to narrow the list.
Status lifecycle:
| Status | Meaning |
|---|---|
| Requested | Created but not released for production |
| Scheduled | Planned and scheduled, not yet ready to issue |
| Open | Ready for production activity |
| Started | Production has begun |
| Completed | Work finished |
| Canceled | Work order canceled |
| Closed | Administrative close state used in list/reporting views |
New work orders default to Open. The list also includes filters such as Current and All.
Tabs in a work order:
- Header: identity, scheduling, assignments, and status
- Line Items: components, assembly selection, and line-level actions
- Equipment Sheet: equipment usage and cost tracking; shown only with the right permission
- Labor Sheet: labor entries and total labor cost; shown only with the right permission
- Notes: production notes; the tab can remain visible even when page access is restricted by security
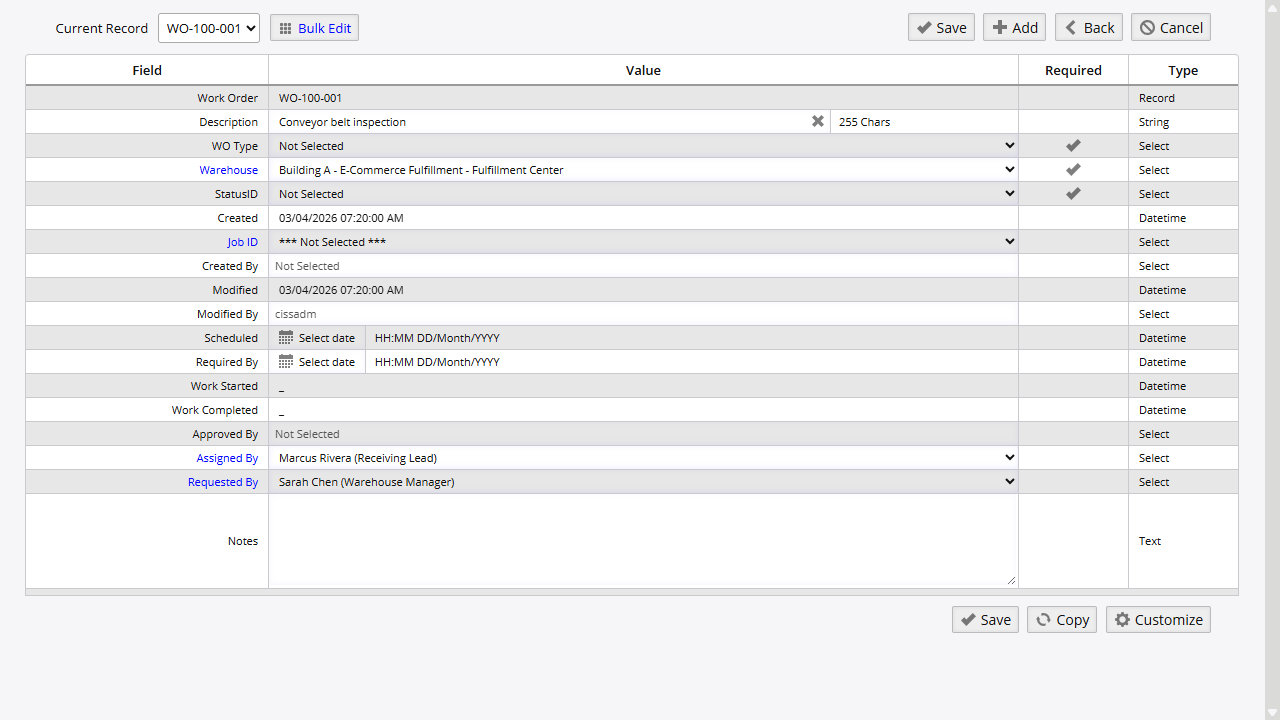
Creating a Work Order
- Go to Orders → Other → Work Orders.
- Click Add Work Order.
- Complete the Header tab.
| Field | Notes |
|---|---|
| Work Order | Auto-generated; users do not type it |
| Description | Purpose or scope of the work |
| WO Type | Category from the Work Order Types list |
| Warehouse | Warehouse where the work is being tracked |
| Status | Use Requested for planning or Open when the order is ready to move forward |
| Job ID | Optional job link |
| Scheduled | Planned work date |
| Required By | Target completion date |
| Assigned By | Person assigning the work |
| Requested By | Person or department requesting the work |
| Notes | Header-level notes |
- Click Save.
Line Items
After saving the header, move to Line Items to add components or define the assembly output.
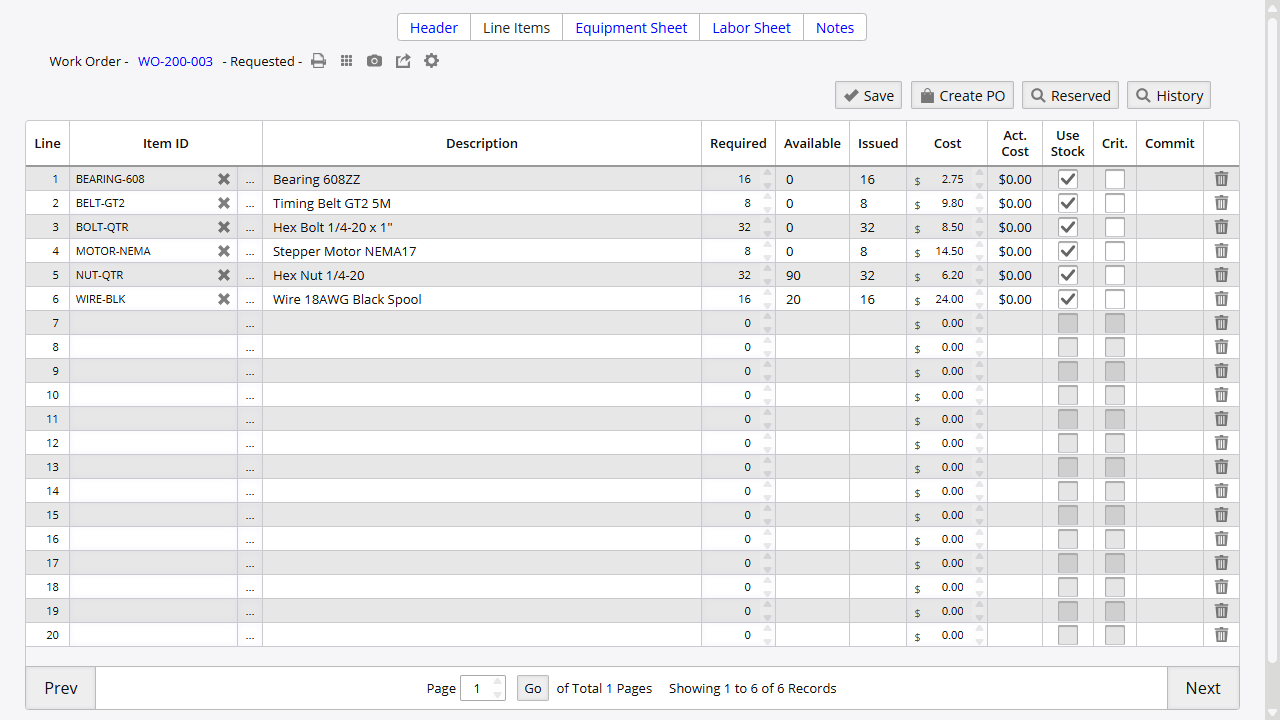
Common line-grid behavior:
- Grid labels can vary slightly by permission and layout, but the main columns center on Item ID, required quantity, availability, issued quantity, and cost.
- Create-PO users can see extra columns such as Use PO and PO Number in alternate views.
- Issue-screen fields like location and lot or serial selection do not belong to this grid. They appear later in the issue process.
Assembly Work Orders
Use this path when the work order should consume components and receive a finished item.
- Enter the finished item in Assembly. The item must be marked as a MAKE item.
- Enter the target Units.
- Click one of these actions:
- Load Top to load only the top-level BOM lines.
- Load Assembly to load all BOM levels, including nested subassemblies.
- Review the loaded component lines and click Save.
- When the status is Open or Started, click Assemble.
- Complete the issue screen, then finalize the transaction.
The system can move the work order into Started when assembly begins. Depending on Admin Options and workflow state, the order may stay Started, remain Open, or move to Completed after posting.
Non-Assembly Work Orders
Use this path when you need to issue internal parts without receiving a finished good.
- Leave Assembly empty.
- Add the required component lines.
- Click Save.
- Click Issue to open the issue flow.
For the full issue-screen steps, see Issue Stock.
BOM in Work Order Context
Work orders can load component lines from a bill of materials and can expose a shortcut into BOM editing before any units are assembled. If you change assembly units after lines already exist, the system can rescale component quantities.
For full BOM setup and maintenance, see Bill of Materials.
Equipment Sheet
The Equipment Sheet tab records asset usage tied to the work order. This tab appears only when the user has the required permission.
| Column | Notes |
|---|---|
| Equipment | Asset selection |
| Description | Read-only description from the selected asset |
| Hours | Usage hours |
| Unit Cost | Cost rate |
| Date | Usage date |
Use the row-level delete checkbox to remove an entry. There is no separate Delete toolbar button on this tab.
Labor Sheet
The Labor Sheet tab records employee time and labor cost. This tab also depends on user permission.
| Column | Notes |
|---|---|
| Employee | Employee selection |
| Hours | Time worked |
| Unit Cost | Labor rate |
| Date | Work date |
Use Calculate to recalculate labor cost totals. A total row appears below the labor grid. Remove entries with the row-level delete checkbox.
Notes
Use Notes to record production instructions, communication, or follow-up detail.
| Field | Notes |
|---|---|
| Employee | Optional association |
| Notes | Free-text note |
| Date | Note date |
The Notes tab can be visible in the tab strip even when a user lacks access to open the Notes page.
Work Order Utilities
History
Use History on Line Items to review what has already been issued for the work order.
Reserved
Use Reserved on Line Items to review inventory reserved for the work order. This appears when work-order purchasing is available.
Create PO
Use Create PO on Line Items when shortage lines should move into purchasing.
Prerequisites:
- The relevant line items must be flagged for Use PO.
- Admin Option 194 must allow PO creation from work orders.
If those prerequisites are not met, the button can still lead to a no-units-found error. For the broader shortage-planning workflow, see Manufacturing Purchasing.
If you change the work-order schedule or required dates after linked POs already exist, the system can warn that those purchase orders need review.
Admin Options
| Option | Effect |
|---|---|
| 194 | Enables Create PO from work-order lines |
| 211 | Controls short-stock warning behavior during WO issue or assemble flow |
Other Admin Options can also change assembly completion behavior, partial assembly prompts, and related issue processing.
Related Topics
On this page